The idea of removing a laptop’s display might sound tempting for those looking to create a more space-efficient setup, but it’s important to consider the practicality, safety, and consequences of such a decision.
Is it Possible to Remove a Laptop’s Display?
Yes, it is technically possible to remove a laptop’s connected display without rendering the rest of the device inoperable. However, there are significant caveats to keep in mind.
1. No Display:
When you remove the laptop’s display, you eliminate its primary screen. Most laptops offer external HDMI and display ports separate from the internal connections to the built-in display. This means that, with the appropriate cable and a standalone monitor, you can reroute the laptop’s signal to an external display and continue using it as you would a traditional desktop computer. This can also serve as a backup option if your laptop’s display malfunctions.
2. Rendered Display Useless:
Removing the display from your laptop may render the display itself useless. Laptop displays are typically hard-wired to the laptop’s internal components. Disconnecting these wires won’t affect the computer’s functionality, but the display won’t have any means of external connection. Unless you possess advanced soldering skills, there’s no straightforward way to repurpose the removed display.
3. Impact on Laptop’s Functionality:
Depending on your laptop’s make and model, the display casing may house other crucial components. These could include wireless receivers and optional ports. Removing the entire display means these parts go with it, potentially severely impacting your laptop’s functionality.
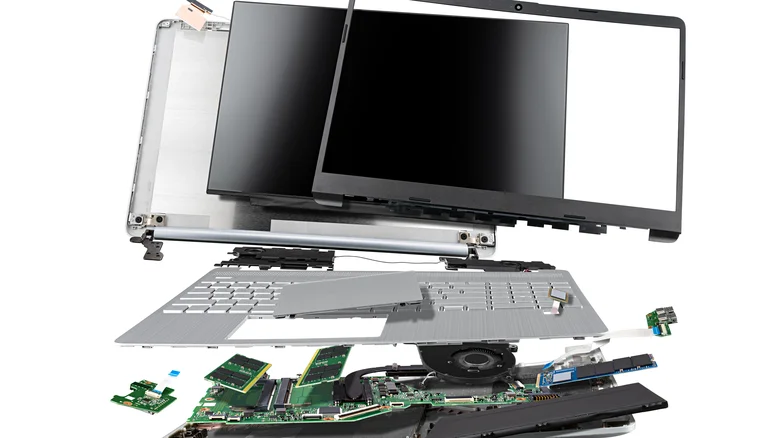
The Delicate Procedure:
Removing a laptop screen is a delicate procedure that requires precision and technical expertise. Since laptop displays are hard-wired, it’s not as simple as just pulling the panel off. To successfully remove a laptop’s display, you must engage in a highly complex disassembly process. This involves disassembling the lower portion of the laptop, including the keyboard, CPU, and more. Only by reaching the screws and wires that secure the upper portion can you proceed. Even then, the connections must be carefully undone to avoid damaging the laptop.
In summary, while it is technically feasible to remove a laptop’s display, it’s a task that should only be undertaken if you possess advanced technical knowledge and are confident in your abilities. Otherwise, if you find yourself needing to remove the display for any reason, it’s advisable to seek professional assistance from a repair shop to avoid potential damage to your laptop.
Rubber ducks have long been a symbol of childhood whimsy, but in recent years, they’ve taken on a new role as the stars of a quirky cruise ship tradition. Known as “cruise ducks,” these little yellow (and sometimes creatively decorated) toys have become a delightful surprise for passengers who stumble upon them hidden in unexpected places around the ship. What started as a playful game has grown into a global phenomenon, uniting cruise enthusiasts in a shared, lighthearted pursuit. But as with any trend, the rise of cruise ducks has also sparked debates about safety, environmental impact, and the rules of the game.
The Origins of the Cruise Ducks Phenomenon
The story of cruise ducks began with a simple idea from an 11-year-old girl named Abby Davis. During a family cruise in 2018, Abby and her mother, Ashley, decided to bring along 50 rubber ducks to hide around the ship. Their goal? To spread joy and create a sense of community among fellow passengers. The idea was an instant hit. As Ashley later shared on the Cruising Ducks website, “We did 7 ducks a day, and we found people of all ages finding the ducks and having a good time looking for them.”
What started as a fun family activity quickly caught on. The Cruising Ducks Facebook group, which now boasts over 82,000 members, has become a hub for enthusiasts to share stories, photos, and tips about their duck-hiding adventures. Some participants even personalize their ducks with names, dates, and messages, turning them into tiny keepsakes that travel the world.
Why Do People Love Cruise Ducks?
The appeal of cruise ducks lies in their simplicity and universality. Here’s why this quirky tradition has captured the hearts of so many:
A Shared Sense of Fun Cruise ships are floating communities, and the hunt for hidden ducks adds an extra layer of excitement to the journey. Whether you’re a child or an adult, finding a brightly colored duck tucked away in a surprising spot brings a moment of joy and connection.
A Global Adventure Cruise ships travel to destinations around the world, and ducks often hitch a ride from one port to the next. The idea that a duck you hide in the Caribbean might later be found in Europe adds a sense of adventure to the game.
A Break from Technology In an age dominated by screens and digital entertainment, cruise ducks offer a refreshingly analog form of fun. They remind us of the simple pleasures of discovery and play.
A Creative Outlet For many enthusiasts, decorating and personalizing ducks is a creative hobby. From glittery designs to themed costumes, these tiny toys become works of art that reflect their creators’ personalities.
The Dark Side of the Duck Trend
While cruise ducks are undeniably fun, the trend has also raised some concerns. As the game has grown in popularity, cruise lines have begun to take notice—and not always in a positive way. Disney Cruise Line, for example, has explicitly banned the practice. In a February 2024 statement, a PlanDisney panelist explained the reasoning behind the policy:
“Disney Cruise Line’s policy is that Guests cannot hide things, such as rubber ducks, in staterooms or public areas … hunting for ducks has gained in popularity among cruisers, but the small ducks are a safety hazard for younger Guests and have environmental impacts.”
These concerns are not unfounded. Rubber ducks, especially small ones, can pose choking hazards for young children. Additionally, passengers searching for ducks in hard-to-reach places could inadvertently put themselves at risk. From an environmental perspective, the production and disposal of large quantities of plastic ducks contribute to waste, which is particularly concerning in the context of ocean conservation.
Balancing Fun and Responsibility
For cruise duck enthusiasts, the key to keeping the tradition alive is to practice it responsibly. Here are a few tips for participating in the game while minimizing its downsides:
Choose Eco-Friendly Ducks Opt for ducks made from sustainable materials or consider using biodegradable alternatives. Some enthusiasts have even started crafting their own ducks from recycled materials.
Be Mindful of Safety Avoid hiding ducks in areas that could pose risks to children or require passengers to climb or reach dangerously. Stick to easily accessible spots that won’t disrupt the ship’s operations.
Respect Cruise Line Policies Before hiding ducks, check the cruise line’s rules and guidelines. Some companies may allow the practice within certain parameters, while others may prohibit it entirely.
Spread Joy, Not Waste Instead of hiding dozens of ducks, focus on quality over quantity. A few thoughtfully placed ducks can bring just as much joy without contributing to unnecessary waste.
The Future of Cruise Ducks
Despite the challenges, the cruise duck trend shows no signs of slowing down. For many passengers, these tiny toys have become a beloved part of the cruising experience, symbolizing the sense of community and adventure that makes these vacations so special. As the tradition evolves, it’s up to enthusiasts and cruise lines alike to find a balance between fun and responsibility, ensuring that the game remains a source of joy for years to come.
Conclusion: A Quirky Tradition with a Big Impact
Cruise ducks are more than just a silly game—they’re a testament to the power of simple, shared experiences to bring people together. From their humble beginnings as a family’s creative idea to their status as a global phenomenon, these little rubber toys have left an indelible mark on the world of cruising. As we navigate the challenges of sustainability and safety, the story of cruise ducks reminds us that even the smallest gestures can make a big difference. So, the next time you set sail, keep an eye out for a hidden duck—it might just make your day.
Since the tragic events of September 11, 2001, airport security has undergone a dramatic transformation. The Transportation Security Administration (TSA) has introduced a range of advanced technologies to enhance safety, including explosives detection systems, canine teams, and full-body scanners. While these measures are designed to protect travelers, they have also sparked significant debates about privacy and personal dignity. This article explores the evolution of full-body scanners, how they work, and the steps taken to address privacy concerns while maintaining robust security.
The Rise of Full-Body Scanners
Full-body scanners were introduced in 2010 following the failed “Underwear Bomber” attack in 2009. These scanners were designed to detect concealed weapons, explosives, and other threats hidden beneath clothing. Initially, two types of scanners were deployed:
Millimeter Wave Scanners: These use harmless electromagnetic waves to create a 3D image of the body.
Backscatter X-Ray Scanners: These use low-level X-rays to produce a detailed image of the body, including private areas.
While both technologies were effective at identifying threats, the backscatter X-ray scanners raised significant privacy concerns due to their highly revealing images.
Privacy Concerns and Public Backlash
When backscatter X-ray scanners were first introduced, many travelers felt uncomfortable with the idea of TSA agents viewing near-nude images of their bodies. News outlets like CBS reported that 15% of Americans refused to undergo the scans, calling them a “virtual strip search.” Vulnerable groups, including the transgender community, expressed concerns about potential humiliation and discrimination, as agents could zoom in on specific body parts.
These concerns led to widespread criticism and calls for change. Advocacy groups and lawmakers pushed for a balance between security and privacy, prompting the TSA to reevaluate its use of backscatter scanners.
The Shift to Millimeter Wave Scanners
In response to public outcry, the TSA began phasing out backscatter X-ray scanners in 2013. Millimeter wave scanners became the standard, offering a more privacy-conscious solution. According to TSA spokesperson David Castelveter, the transition was strategic, with older equipment being moved to smaller airports.
Today’s millimeter wave scanners use advanced software to generate a generic, gender-neutral avatar of the passenger. Instead of displaying detailed images of the body, the scanner highlights areas that may require additional screening. This approach ensures that privacy is respected while maintaining high security standards.
How Modern Full-Body Scanners Work
Modern full-body scanners are designed with privacy in mind. Here’s how they function:
Generic Avatar: The scanner creates a nondescript, paper doll-like image of the passenger, eliminating details like weight, height, or private areas.
Targeted Alerts: If the scanner detects a potential threat, it highlights the area on the avatar, allowing TSA agents to conduct a focused pat-down or inspection.
No Storage: The images are not stored or saved, ensuring that passengers’ privacy is protected.
This technology strikes a balance between effective threat detection and respect for individual dignity.
Additional Security Measures
In addition to full-body scanners, the TSA has implemented other advanced security measures to keep airports safe:
Explosives Trace Detection (ETD): Agents may swab passengers’ hands, luggage, or electronic devices to test for traces of explosives.
Prohibited Items: Certain electronics and liquids are restricted to prevent potential threats.
Behavioral Analysis: TSA agents are trained to identify suspicious behavior or anomalies during the screening process.
These measures work in tandem with full-body scanners to create a multi-layered security system.
The Future of Airport Security
As technology continues to evolve, so too will airport security. The TSA is exploring new innovations, such as biometric screening and artificial intelligence, to enhance safety while minimizing inconvenience for travelers. The goal is to create a seamless and respectful screening process that prioritizes both security and privacy.
Key Takeaways
Full-body scanners were introduced in 2010 to detect concealed threats but initially raised significant privacy concerns.
Backscatter X-ray scanners, which produced detailed images of the body, were phased out in favor of millimeter wave scanners.
Modern scanners use generic avatars and targeted alerts to protect passenger privacy while maintaining security.
The TSA continues to implement advanced technologies and protocols to ensure safe and efficient airport screenings.
Why This Matters
Understanding the evolution of airport security helps travelers feel more informed and confident during the screening process. By balancing safety and privacy, the TSA aims to create a secure and respectful environment for all passengers. Whether you’re a frequent flyer or an occasional traveler, knowing how these systems work can make your journey smoother and less stressful.
As airport security continues to evolve, one thing remains clear: the commitment to protecting passengers while respecting their rights is at the heart of every innovation. Stay informed, stay safe, and travel with confidence.