Starlink has transformed internet access, delivering high-speed connectivity to even the most remote areas. However, while its satellite technology is cutting-edge, some users may find their Starlink setup missing a key feature: Ethernet connectivity. For those who need a wired connection for gaming, streaming, or other high-bandwidth activities, the Starlink Ethernet Adapter is an indispensable tool. This guide will explain why the Starlink Ethernet Adapter is essential, how to install it, troubleshoot common issues, and explore alternative solutions.
Why the Starlink Ethernet Adapter is Essential
While Starlink’s Wi-Fi is robust, Ethernet connections offer unmatched stability, speed, and reliability. A wired connection is particularly beneficial for:
Online Gaming: Minimize lag and enjoy seamless gameplay.
4K Streaming: Eliminate buffering and enjoy uninterrupted entertainment.
Remote Work: Ensure stable video calls and fast file transfers.
Weak Wi-Fi Zones: Overcome signal issues caused by distance or obstructions.
However, not all Starlink routers come with built-in Ethernet ports. Here’s a quick overview:
Gen 1 Routers: Include one Ethernet port.
Gen 2 Routers: Lack an Ethernet port, requiring the Starlink Ethernet Adapter.
Gen 3 Routers: Feature two Ethernet ports, eliminating the need for an adapter.
If you own a Gen 2 router, the Starlink Ethernet Adapter is a must-have accessory. Let’s explore how to set it up and optimize your Starlink experience.
How to Install the Starlink Ethernet Adapter
Installing the Starlink Ethernet Adapter is a simple process. Follow these steps to integrate it into your Starlink system:
Power Down Your Starlink System: Unplug the router and dish cables to ensure safety during installation.
Unplug the Starlink Cable: Locate the angled connector at the bottom of the router and disconnect it.
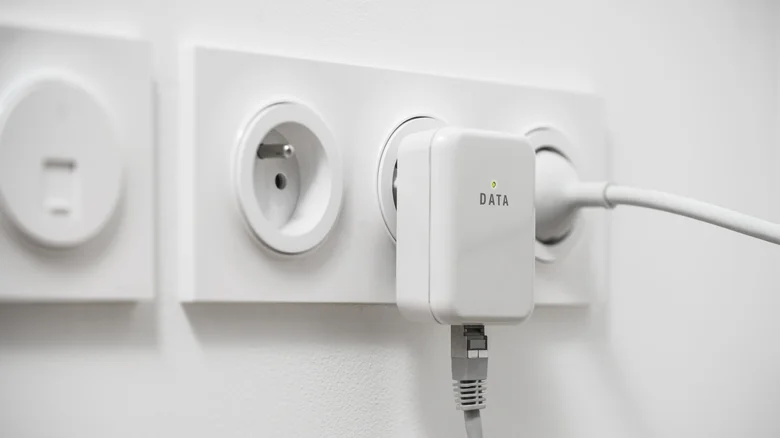
Connect the Ethernet Adapter: Plug the adapter’s cord into the Starlink socket on the router. It should match the connector you just unplugged.
Reconnect the Dish Cable: Attach the Starlink dish cable to the other end of the Ethernet adapter.
Power Up the System: Reconnect the power cables and wait a few minutes for the system to reboot.
Connect Your Device: Plug an Ethernet cable into the adapter’s port and connect it to your desired device.
That’s it! The Starlink Ethernet Adapter requires no additional configuration, and your Starlink system will function as usual, now with the added benefit of a wired connection.
Troubleshooting the Starlink Ethernet Adapter
While the setup is straightforward, occasional issues may arise. Here’s how to troubleshoot common problems:
Check Cable Connections: Ensure all cables are securely fitted and undamaged. A loose or faulty Ethernet cable is often the cause of issues.
Reboot the System: Power down the Starlink system for at least 30 seconds before restarting it. This simple step can resolve many connectivity problems.
Test with Another Device: If the issue persists, try connecting a different device to the Ethernet adapter. The problem may lie with the original device’s hardware.
Update Firmware: Ensure your Starlink router’s firmware is up to date. Firmware updates can resolve compatibility issues with peripheral devices like the Ethernet adapter.
Alternatives to the Starlink Ethernet Adapter
While the Starlink Ethernet Adapter is the most straightforward solution, there are alternative options depending on your needs:
Wi-Fi Range Extenders with Ethernet Ports: Devices like the TP-Link AC1200 can extend your Wi-Fi range while providing Ethernet connectivity. However, this setup still relies on a wireless connection to the Starlink router, which may not offer the same stability as a direct Ethernet link.
Powerline Adapters: These devices use your home’s electrical wiring to transmit data, offering a wired connection without the need for long Ethernet cables. They’re ideal for large homes or buildings with thick walls that weaken Wi-Fi signals.
Mesh Wi-Fi Systems: Advanced mesh systems often include Ethernet backhaul capabilities, allowing you to create a wired network backbone while maintaining Wi-Fi coverage throughout your space.
Upgrading to a Gen 3 Router: If you’re a Gen 2 router user considering a long-term upgrade, the Starlink Gen 3 router comes with two built-in Ethernet ports, eliminating the need for an adapter altogether.
Why Choose the Starlink Ethernet Adapter?
The Starlink Ethernet Adapter is the most reliable and cost-effective way to add Ethernet functionality to your Gen 2 router. It’s easy to install, requires no additional configuration, and provides the stability and speed that wired connections are known for. Whether you’re a gamer, streamer, or remote worker, this adapter ensures your Starlink connection meets your needs.
The Starlink Ethernet Adapter is a small yet powerful accessory that can significantly enhance your Starlink experience. By adding a wired connection to your setup, you can enjoy faster speeds, lower latency, and greater reliability—essential for today’s demanding online activities.
For Gen 2 router users, the Starlink Ethernet Adapter is a must-have. However, if you’re planning a long-term upgrade, the Gen 3 router’s built-in Ethernet ports offer a seamless experience. Whichever path you choose, this guide ensures you’re equipped with the knowledge to optimize your Starlink connection.
By integrating the Starlink Ethernet Adapter into your setup, you’re not just improving your internet experience—you’re future-proofing it. Stay connected, stay productive, and unlock the full potential of your Starlink system.