Techfullnews

How to Avoid Spam Calls on Your iPhone

How to Avoid Spam Calls on Your iPhone

Spam calls are a nuisance, and they can be especially disruptive when you’re busy or trying to relax. But there are a few things you can do to avoid them on your iPhone.

Silence unknown callers

image 121

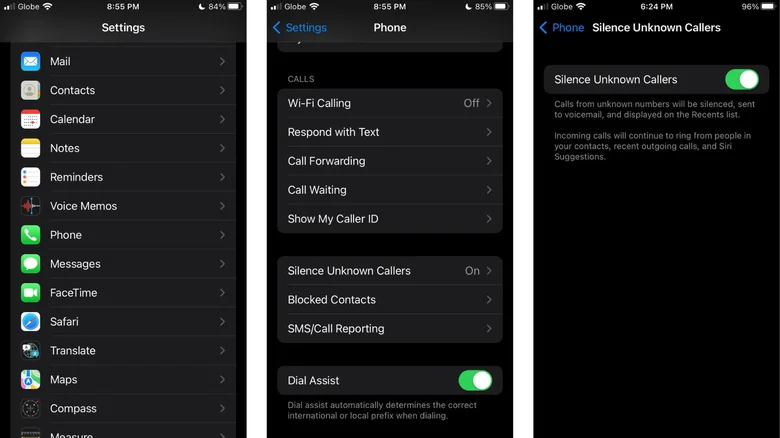
One of the easiest ways to reduce spam calls is to enable the “Silence Unknown Callers” feature in your iPhone’s Settings app. This will send all calls from numbers that aren’t in your Contacts or Messages app straight to voicemail.

To enable “Silence Unknown Callers”:

Open the Settings app.
Tap Phone.
Scroll down and tap Silence Unknown Callers.
Toggle on Silence Unknown Callers.
Silence junk callers

If your carrier supports it, you can also enable the “Silence Junk Callers” feature. This will silence calls that your carrier has identified as spam or fraud.

To enable “Silence Junk Callers”:

Open the Settings app.
Tap Phone.
Tap Call Blocking & Identification.
Toggle on Silence Junk Callers.
Use call screening apps

There are a number of call screening apps available that can help you block spam calls. These apps use machine learning and extensive databases of spam callers to identify and block unwanted calls.

Some popular call screening apps include:

Robokiller
Hiya
Truecaller
CallProtect by AT&T
Scam Shield by T-Mobile
Use Do Not Disturb mode

If you only want to avoid spam calls during certain times of day, you can use Do Not Disturb mode. This mode will silence all calls and notifications except for those from contacts you’ve added to your Favorites list.

image 123

To enable Do Not Disturb mode:

Open the Control Center.

Tap the crescent moon icon.

To schedule Do Not Disturb mode to turn on and off at certain times, tap Options and toggle on Schedule.
Additional tips

Be careful about sharing your phone number with businesses and organizations. Only give your number to businesses that you trust and that have a good reputation.

Don’t answer calls from unknown numbers. If you do accidentally answer a spam call, hang up immediately.
If you receive a voicemail from a spam caller, don’t call them back.

Report spam calls to your carrier or to the Federal Trade Commission (FTC).

By following these tips, you can reduce the number of spam calls you receive on your iPhone and enjoy more peace and quiet.

ADVERTISEMENT
RECOMMENDED
NEXT UP

The Amazon Fire TV Stick remote is a great way to control your Fire TV Stick without having to fumble with multiple remotes. It’s powered by two AAA batteries, which means you’ll need to replace them when they run out.

There are a few ways to check the battery status of your Fire TV Stick remote.

Check the battery status in the Settings app:

image 79

Navigate to Settings on your Fire TV Stick.

Select Remotes & Bluetooth Devices.

Go to Amazon Fire TV Remotes.

Check the battery status in the sidebar.

image 80

Use a third-party app:

Install the Developer Tools Menu app from the Amazon Appstore.

Open the app and select Developer Tools Menu from the Quick Launch Shortcuts.

Turn on the toggle next to System X-Ray.

An overlay will appear at the top of the screen.

The Fire TV Stick remote battery percentage will be displayed in the top right corner next to REM.

In addition to the remaining battery percentage, you’ll also see a color-coded battery icon. If the icon is green, it means your battery percentage is high. Orange indicates there’s about half the battery remaining, while red means the battery is low.

If your remote batteries are low, you can replace them by following these steps:

Remove the back cover of the remote.
Remove the old batteries and insert two new AAA batteries.
Replace the back cover of the remote.
Your Fire TV Stick remote should now be working with the new batteries.

Here are some additional tips for extending the battery life of your Fire TV Stick remote:

Turn off the remote when you’re not using it.
Keep the remote away from heat and moisture.
Avoid pressing the buttons on the remote repeatedly.
Use alkaline batteries, as they last longer than zinc carbon batteries.

By following these tips, you can help to ensure that your Fire TV Stick remote battery lasts for as long as possible.

When you finish reading a great book, you want to share it with your friends and family. In the past, you could simply lend them your physical copy. But with ebooks, things are a bit more complicated. You can’t just hand over your Kindle, and you don’t want to buy them a copy if they’re only going to read it once.

Fortunately, Amazon makes it easy to loan out Kindle books. Here’s how it works:

Go to the Amazon website and sign in to your account.

Click on “Content & Devices” in the menu bar.

Under “Digital Content,” click on “Books.”

Find the book you want to loan and click on the “More Actions” button.

Select “Loan this Title.”

Enter the email address of the person you want to loan the book to and click “Send.”

The recipient will receive an email with a link to download the book. They will have 14 days to read it before it expires.

Not all ebooks are eligible for loaning. The publisher of the book has to opt in to the program. You can see if a book is eligible by looking for the “Loan this Title” button next to it.

image 76

You can also loan books to members of your Amazon Household. To do this, follow the same steps as above, but select “Manage Family Library” instead of “Loan this Title.”

Once you’ve loaned a book, you can track its progress in the “Loan History” section of your Content & Devices page.

Loaning out Kindle books is a great way to share your favorite books with your friends and family. It’s a quick and easy way to let them experience the same joy you did.

image 77

Here are some additional things to keep in mind when loaning out Kindle books:

You can only loan out a book once.
The recipient must have a Kindle or other compatible device to read the book.
The recipient cannot loan the book out to anyone else.
If the recipient does not return the book within 14 days, it will automatically be returned to you.

ADVERTISEMENT
Receive the latest news

Subscribe To Our Weekly Newsletter

Get notified about new articles