Techfullnews

Starfield’s Rain Bug: A Hilarious Bug or a Feature?

Starfield's Rain Bug

Starfield, Bethesda’s upcoming sci-fi RPG, is shaping up to be a game full of strange and wonderful sights. From hamburger-shaped spaceships to Skynet hijacking your ship, there’s something for everyone.

But what’s really got gamers talking is a photo mode capture of how Starfield’s rain works.

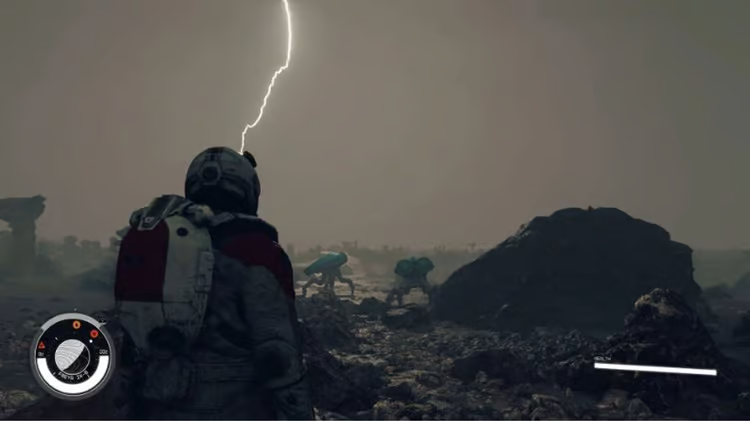
In most video games, rain is concentrated to a small area in the immediate vicinity of the player. This is because rendering rain across the entire world would be too computationally expensive.

But in Starfield, the rain is attached to the player character. This means that when you zoom out in photo mode, the rain follows you around like a Truman Show effect.

Some players have reported that this is a bug, while others believe that it’s a deliberate feature. Bethesda hasn’t commented on the issue yet, so it’s unclear whether it will be fixed in the final game.

But one thing is for sure: the rain bug has led to some hilarious photo mode captures. Here are a few of our favorites:

  • A player standing in a desert with a rain cloud following them around.
  • A player standing on a mountaintop with a rainbow arching over their head, while the rain falls all around them.
  • A player taking a selfie with a spaceship in the background, while the rain falls on their face.

Whether it’s a bug or a feature, the rain in Starfield is sure to provide players with some memorable moments.

Additional Information:

  • The rain bug is similar to another bug that’s been causing asteroids to follow players’ ships around like pets.
  • In a more extreme example of this bug, one player had the entire city of New Atlantis cling to their character.
  • Game developers in the comments have confirmed that the rain bug is most likely a bug, and that Bethesda likely meant for the rain to lock to the camera in photo mode.
  • It’s unclear whether Bethesda will fix the rain bug in the final game.

Conclusion:

The rain bug in Starfield is a hilarious bug that has led to some creative photo mode captures. It’s unclear whether Bethesda will fix the bug in the final game, but it’s sure to provide players with some memorable moments.

ADVERTISEMENT
RECOMMENDED
NEXT UP

Apple has introduced a new Camera Control button on the iPhone 16 and iPhone 16 Pro, aimed at enhancing the photography experience for users. While many are accustomed to the onscreen controls, this physical button offers unique features and the flexibility to handle more than just camera functions.

Understanding the iPhone 16 Camera Control Button

The Camera Control button is an innovative combination of a physical button and a capacitive slider, allowing users to easily adjust various camera settings like zoom, contrast, and brightness. However, its functionality doesn’t end with photography; it can be customized to act as a second Action button for other tasks.

Visual Intelligence: An Upcoming Feature

One of the most exciting features associated with the Camera Control button is Visual Intelligence. This capability utilizes Apple’s AI technology to provide information about what the camera is focused on. For instance, it can identify restaurant details, determine dog breeds, or offer study aids through AI models like ChatGPT. To activate Visual Intelligence, press and hold the Camera Control button and tap it again to view relevant information. This feature is set to roll out later this year.

Current Uses of the Camera Control Button

While waiting for Visual Intelligence, you can already make good use of the Camera Control button for various non-photographic tasks. If your primary Action button is already designated for functions like the flashlight, you can assign the Camera Control button for features like Magnifier or Code Scanner.

Accessing the Magnifier

The Magnifier feature is particularly handy for magnifying small text or intricate details. Traditionally, accessing it requires several steps through the Control Center. By assigning it to the Camera Control button, you can simplify this process significantly.

To set it up:

Navigate to Settings > Camera > Camera Control and select Magnifier.

Now, pressing the Camera Control button will instantly activate the Magnifier. Additionally, by applying a firm touch to the button, you can adjust zoom and settings like contrast, brightness, and filters without navigating through the screen.

Using the Code Scanner

For those who frequently scan QR codes, the Code Scanner can also be assigned to the Camera Control button for quick access. This allows for immediate use of the QR code reader, and you can zoom in by firm-pressing the button, which isn’t possible with the standard Camera app.

To configure this:

Go to Settings > Camera > Camera Control and choose Code Scanner.

The Code Scanner has several advantages, such as the ability to turn on the flashlight for better scanning visibility and opening the QR code’s link within a dedicated app rather than a cluttered Safari window.

Future Possibilities for the Camera Control Button

Although the Camera Control button currently supports only camera-related applications, there is potential for future enhancements. It could evolve to function as a quick document scanner or activate accessibility features like Live Recognition. The possibilities for expanding its functionality are exciting for iPhone 16 users.

In conclusion, the Camera Control button on the iPhone 16 offers a range of customizable features that extend beyond photography. Whether you’re adjusting camera settings or streamlining daily tasks, this button enhances your overall iPhone experience.

Customizing your computer is one of the best ways to make it truly feel like your own. From changing wallpapers to using productivity tools like Focus Assist and widgets, there are many ways to personalize your setup. One often overlooked method, especially for Windows users, is learning how to turn any photo into a custom icon for folders or shortcuts.

At first glance, changing icons might seem unnecessary. The default Windows icons are functional and familiar, so why change them? However, customizing icons can make your computer more visually appealing and better organized. For instance, instead of using the same folder icon for both a project and your personal photos, you can replace them with images that better represent their content.

While Mac users often take advantage of this feature, Windows users can also enjoy the benefits of custom icons. Though it involves a few steps, learning how to turn any photo into an icon is relatively straightforward.

Using Windows’ Built-In Icons

Before we dive into how to turn any photo into a custom icon, you might want to explore Windows’ built-in icon options. Though they aren’t as personalized as custom images, they offer a quick and simple way to switch things up.

Here’s how you can use Windows’ built-in icon options:

Right-click the folder or shortcut you want to customize.

Click “Properties.”

Navigate to the “Customize” tab for folders or the “Shortcut” tab for shortcuts.

Select “Change Icon.”

Browse the icons provided by Windows, choose one, and click “OK.”

Click “OK” again to apply the new icon.

While changing icons won’t impact your computer’s functionality, keep in mind that any folders with custom icons will no longer display previews of their contents. If Windows’ default icons aren’t what you’re looking for, there are plenty of external resources like Iconfinder that offer free and premium icons for more variety.

How to Turn Any Photo into a Custom Icon

Now, let’s move on to how to turn any photo into a custom icon for Windows. This process allows you to add a personal touch to your computer and visually organize your files more effectively.

Follow these steps to create and apply custom icons:

Choose a Photo

Start by selecting a photo you want to use as your new icon. Simpler images with high contrast tend to work better for small icon sizes, as they remain clear even when scaled down.

Convert the Photo to an ICO File

Windows icons require a specific file format: .ico. You’ll need to convert your chosen image into this format. You can use free online converters like ConvertICO or programs like ICOfx to easily convert your photo to an .ico file.

Apply the Custom Icon

Once your image is converted to the correct format, follow these steps to apply it:

Right-click the folder or shortcut you want to customize.

Select “Properties.”

Go to the “Customize” tab (for folders) or “Shortcut” tab (for shortcuts).

Click on “Change Icon.”

Browse your computer for the .ico file you created, select it, and click “OK.”

Click “OK” again to finalize the change.

Now, your folder or shortcut will display the custom photo you chose as its icon. You can repeat this process for other folders and shortcuts to further personalize your desktop.

Why Customize Icons?

Learning how to turn any photo into an icon offers several benefits:

Personalization: Custom icons make your computer feel unique and reflect your personal style.
Organization: Different icons for different files or folders help you visually sort and find items quickly.

Creativity: Using your own photos as icons allows for endless creativity in designing your desktop.
While this feature may be less common among Windows users, it’s a fun and practical way to enhance your computer’s appearance and functionality.

Finding Additional Icons

If you don’t want to create custom icons yourself, websites like Iconfinder provide a wide range of ready-made icons. Many are free, and you can also find premium options for a small fee, giving you plenty of alternatives to Windows’ default icons.

ADVERTISEMENT
Receive the latest news

Subscribe To Our Weekly Newsletter

Get notified about new articles